2009-03-28

Macarons for Dad

Having worked up a taste for macarons in this post, a follow up was destined to come sooner or later. The perfect opportunity turned out to be dad's birthday. He's got pretty much everything he needs, and is somewhat of a sucker for sweets, so as far as presents go it should work like a charm. Besides, parents are supposed to appreciate anything their kids (even those above the age of 30) make for them, so no matter how it turns out I'm safe.. right? :-)

I decided to make pistachio macarons, and somewhat unorthodoxly fill them with lemon curd. This time, the two recipes are from Jan Hedh's Passion för Desserter (‘Passion for Desserts’, sometimes Swedish is remarkable easy to rewrite into English...) Compared to last time, the biggest difference is baking time and heat.

I think they turned out much better than last time, but I've only ever tasted macarons I made myself, so I don't know if I'm much of a judge on the matter. Judging from online sources, it does however seem to me that these are closer to what the blogosphere considers good macarons.

Here are some pictures, recipes are further down. It's a pity I have to hold this post until they're delivered... :-/


Good lining, right amount of curd...


Fairly smooth surface, nice color (although not very reminiscent of pistachios)

Pistachio Macarons
200 g Confectioner's Sugar
50 g Almond
50 g Pistachios
100 g Egg Whites (if they've been sitting out in the fridge for a few days that's even better)
1 tsp Lemon Juice
30 g Sugar

Ground the nuts into a flour. Preheat the oven to 170°C. Mix the nut flour and the confectioner's sugar in a bowl. Whisk the egg whites and the lemon juice in anther bowl. Add the sugar and beat it into a meringue. Fold in the dry stuff, don't over-work it. Use a plain tipped pastry bag to make 2–3 cm rounds on parchment covered baking sheets. Let them sit out for 15–30 minutes before baking for 7–8 minutes. Let them cool.

Lemon Curd
1 sheet Gelatin
3 Eggs
150 g Sugar
75 g Lemon Juice
zest from 1 ½ Lemon
100 g Unsalted Butter

Let the gelatin soak in cold water. Whip the egg and half of the sugar fluffy. Bring the rest of the sugar, the butter, the lemon juice and the lemon zest to a boil. Pour the lemon mix over the egg mix while whisking. Mix thoroughly. Pour everything back into the pot and bring it carefully to a near boil experience. Keep whisking all along. Take it off the heat and whisk it smooth. Squeeze the gelatin and let it dissolve in the curd. Strain it into a plastic container and cool quickly in a cold bath. Let it sit in the fridge for a while to harden.

2009-03-27

The Daring Bakers go to Italy...and cooks!


March held a lot of excitement for the Daring Bakers. First of all, our beautiful new website was launched. Make sure to go check it out, because it is very nice! And then, there was the challenge....
The March 2009 challenge is hosted by Mary of Beans and Caviar, Melinda of Melbourne Larder and Enza of Io Da Grande. They have chosen Lasagne of Emilia-Romagna from The Splendid Table by Lynne Rossetto Kasper as the challenge.
I had to read that a couple of times before getting that yes, we were actually making lasagne. Lasagne as in pasta with ragu and cheese and bechamel. No chocolate, no buttercream, no folding in of stiffly whipped egg whites. Nope, this time we were to make our own pasta dough. That's an interesting challenge, people! Thanks Mary, Melinda and Enza for your creativity and for surprising us with this!

Oh, before I continue, I should tell you that all the recipes can be found on the websites of our lovely hosts. They are long, so I will not repost them here.

Day 1: Buying new stuff
The Daring Bakers will never force you to go out and buy fancy new kitchen equipment in order to complete the challenges. We were thus given instructions on how to hand roll pasta dough, into lasagne sheets the thickness of a paper. I read the instructions, and told Markus that we probably would want to buy that pasta machine that we'd been talking about on and off for years. Yes, handrolling would have been even more of a challenge. But see, without a pasta machine we would probably never have made pasta ourselves again after this challenge. Now that we have a pasta machine, we've started talking about all the wonderful pasta concoctions we want to create (gorgonzola and walnut ravioli, anyone?). We also needed a new dish for the lasagne. A large rectangular stoneware dish is something we have been missing in our kitchen for a long time (it's very hard to make lasagne in an oval shaped dish since pasta sheets are, well, not oval), so I went and bought us a very pretty Le Creuset dish. See, we're helping the economy! (Not ours, though.)

Day 2: Making the Ragu alla Contadina (Country style ragu)
According to the challenge we could use our own favourite meat ragu recipe (or a vegetarian one for those with such proclivities). We decided to use the given recipe for a Ragu alla Contadina and that was a good decision.
The recipe asked us to buy whole meat and grind it ourselves. We don't own a meat grinder (yet) and one thing with foreign recipes is that cuts of meat are hard to translate. I think different countries use partly different cuts, so when faced with "boneless veal shoulder or round" and "beef skirt steak", I don't really know what to ask for in Swedish in the grocery store. The solution was to buy ready-ground veal and beef. There was no ground pork though, so we got a slice of pork loin and ground it in the food processor. I don't think that was ideal cause it ended up chunky rather than ground, but once it got cooking it was okay.
So, here's a picture of the mise en place for the ragu. The carrot kind of escaped under a plate.


Yup, that's a bottle of store-bought stock between the wine and the glass of milk. The recipe called for chicken or beef stock, preferably home-made. We used store-bought game stock. I've never made this in another way so I can't compare, but we thought it worked with its meaty, earthy flavour. Oh, and that glass of milk is not 100% milk since we ran out when we had almost poured two cups, so we had to top it off with 2-3 tablespoons of cream. I can't imagine that had any negative impact on the flavour...
Making the ragu was very straight-forward and posed no problems. It took a bit of time (most of it consisting of letting it bubble slowly on the stove and stirring once in a while) but it was well worth it - it was absolutely delicious! The meat had an almost melt-in-your-mouth consistency and we had to stop ourselves from "tasting" it over and over again ("are you sure it doesn't need more pepper? Let's have another taste."). But in to the fridge it went and we went on to making the pasta...

Day 2, later: The big challenge - making the Pasta Verde dough
I think I read the instructions for this three times before starting. Making a well out of flour, putting the eggs and spinach in the middle, stir that together and then gradually incorporate more and more flour from the sides of the well. We cut down on the spinach (the recipe called for 300 g, we used maybe 100 g) but I still found it very hard to do as the instructions said because the spinach kept creeping away and ending up outside the flour well. Here's an action shot (where you also can see the new pasta machine in the background, and the pretty snow-covered trees outside our kitchen windows):


There seemed to be an awful lot of flour, and when the dough had reached a stage where it was "satiny, smooth and very elastic", there was quite a bit left:


We decided to leave that flour out, because our dough was pretty and smooth green ball:


We wrapped the dough in plastic and let it rest in room temperature. After an hour or so, we noticed that it wasn't ball shaped anymore, but had started to float out and go all soft on us. D'oh! We decided to wing it and add more flour rather than to start from scratch, and after more kneading and slightly nervous resting we did a small test run through the pasta machine and - success! I guess we should have trusted the recipe and used all the flour to begin with, huh? Ah, hindsight, always so lovely... Rather than rolling out all the dough and drying it, we put it in the fridge to be rolled out the day after - the day of lasagna-making!

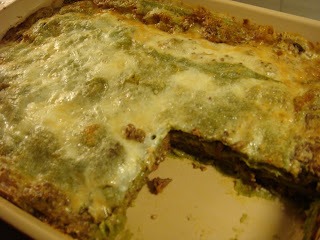
Day 3: Making the lasagna, and enjoying it with a good wine and a good friend.
We heated the ragu over low temperature on the stove, and made the bechamel sauce. We did some tinkering with the measurements for the bechamel (4 tablespoons of flour and 4 tablespoons of butter can't both be weighing 60 grams!) but other than that, there were no problems. Then came the moment of truth: making the pasta sheets! The dough seemed to have held up nicely in the fridge and still had the right feel to it. Markus turned the handle of the pasta machine around and around again, and our poor old IKEA kitchen table which was unsteady to begin with became even more squeaky.


The pasta sheets came out beautiful and the dough was a breeze to work with. We skipped the step of pre-boiling the pasta since we doubted that the very thin sheets would survive boiling without breaking apart and/or sticking together. Instead, we went straight to assembly, layering pasta, a thin spread of bechamel, then a thin spread of ragu and over that a generous sprinkling of parmesan cheese. We got six layers of pasta in our lasagne, then we were out of both pasta, ragu and bechamel - perfect!
We had invited a friend over for dinner, and the lasagne was a success. We found that instead of tasting like pasta baked with meat and cheese, like lasagne usually does, this one had all the components melting together into a wonderful, flavourful unity. We ate the whole thing (to Markus dismay, who wanted leftovers for his lunch box) and combined with a couple of bottles of Chianti and many laughs, it made for a wonderful evening.

2009-03-24

I like them apples!

Remember the apple ice cream from two weeks ago? Turns out you're supposed to serve it with caramel sauce!

We had a friend over for dinner shortly after I made the ice cream, and thought we should dish it out as dessert. Needs something more than just plain ice cream (however delicious) to be a proper dessert though, and so the choice fell on caramel sauce. We used one from a book called “Såsbok” (which just means ‘sauce book’).

To make it you need:
2 dl Cream
2 tbsp Dark Syrup
½ dl Sugar
2 tbsp Butter

Combine cream, syrup and sugar in a pan and bring it to a boil. Add the butter and keep stirring until it thickens (5–10 minutes). Pour it over the ice cream and serve immediately. Works wonders with the apple and cinnamon ice cream, is probably good on others as well.


Hot caramel sauce starting to melt the ice cream

2009-03-20

Fancy lunch

I've never liked cooking for myself. Cooking by myself, yes, but when it's time to eat I prefer the company of at least one other person. But working from home does mean that I have to cook for myself at least once a day. I want my lunch to be easy to make, not too heavy, and preferably "brunchy" - that's why I loved that poached egg bread salad that I made last week. Starting this blog has actually made me better at eating lunch and cooking something - pasta with sauce out of a can, or even worse, deep frozen pizza, isn't really anything to blog about.

Some people probably think I'm crazy for making "fancy" foods for myself in the middle of the day, but I find that I feel better about myself and my situation when I eat something that has got some care and effort in it. And making today's lunch didn't take much more time than it does to bool pasta and heat ready-made sauce. Taking photos of the dish for the blog also means that I get to eat something that not only tastes nice, but also looks (at least minimally) pretty.

I was in the mood for salad today; something sweet, light and sophisticated. And when I found a recipe for grilled peach salad with bresaola and a creamy dressing over at Jamie Oliver's site, I knew what I wanted. I kept my fingers crossed that our small neighbourhood store would have peaches or nectarines, or even plums, because that would work too. Of course they didn't, cause it isn't peach season, but I couldn't get the peach thing out of my mind (have I told you I love peaches? I do.). So I did something I very rarely do: I bought canned peaches. In light syrup. And while I grabbed that can, it suddenly dawned on me what I was going to make with it. It's inspired by Jamie's recipe, but nothing like it. It was however, very good. I should tell you though that it's not really a full lunch, more of a starter or a light bite. Adding salad and serving it with some bread would make it more substantial.


Chèvre gratinated peaches with serrano ham and basil

2 peach halves (if you have fresh one, congratualtions!)
2 thin slices of chèvre (goat cheese)
Olive oil
Black pepper
1 slice serrano ham (prosciutto would work too, or bresaola)
Fresh basil
(Basil vinaigrette)

Slice a small part off the bottom the rounded part of the peach halves, that way they won't wobble around. Place a slice of chèvre on top of each peach. Drizzle a tiny amount of olive oil on top, and finally take a couple of turns on the pepper mill. Place in the oven at 225°C for about 10 minutes, until the cheese have started to melt a little. Place the serrano ham on a plate, and put the peach halves on top. Decorate with some fresh basil. I also made a basil vinaigrette (you can kind of see it in the lower right hand corner of the photo) but it didn't turn out so good so I won't give you the recipe. But do make your own because it really complements the other flavours.

2009-03-18

Lunch sandwich

I've mentioned before that I'm bad at eating lunch because I work from home and tend to forget about it. I'm trying to get better though, and this was today's meal. I used to make this a lot before we went to Hong Kong but since we came back to Sweden I guess I've forgotten about it, until today. It's one of those things for which there is really no recipe, but I'll tell you how I went about it.


Mushroom-apple cheese melt sandwich

Put the oven to 175°C. Take a rather large piece of bread, today I used a darker sort of mini baguette which I sliced in two. Heat some oil or butter in a pan. While the butter melts, take a handful of mushrooms and quarter them. Also take a small apple and dice that, you want dice about the same size as you mushroom quarters. If you want to you could chop up an onion finely too, I didn't today. Toss the mushrooms and apples (and onion) in the pan and fry until the mushrooms are going soft. Season with salt, pepper and some paprika powder (it goes well with the mushrooms). Then add a couple of hefty tablespoons of crème fraiche. Now in Sweden there are all kinds of flavoured crème fraiche varieties. The one I used today is flavoured with porcini mushrooms (accounting for like 5% of the volume of crème fraiche, but hey, it's something, and it was actual dried porcinis, not artificial flavouring), thyme and lemon. I've used other varieties of flavoured crème fraiche before, like French herbs, mustard/tarragon, or even chili/paprika (then I usually toss some spicy sausage in as well), and you can use plain crème fraiche too, but then you probably want to add some more spices. Anyway, a couple of tablespoons of crème fraiche goes into the pan; stir around so that it melts a bit. Then you just transfer the mushroom-apple sauce on to the bread slices, that you have placed on some sort of oven proof dish. I prefer a snug fitting pan, cause then it's easy to scoop up any sauce that falls off the bread. Finally, grate some cheese on top. I prefer a flavourful cheese, like cheddar. Today I used parmesan because that's what was in the fridge. Mozarella would work too. Put in the oven for about 10 minutes, until the cheese are melting and getting a golden colour. Since we had fresh thyme at home (thyme is my favourite herb) I topped the sandwich with a couple of sprigs before eating. Happy lunch!

2009-03-17

St. Patrick's Day

Yesterday was St. Patrick's Day, and even though neither one of us has any connection to Ireland I couldn't resist trying out two recipes with an Irish feel. Both had Guinness stout in them, but since the store didn't have any Guinness I went with Murphy's instead - it's basically the same thing (if any Irish people are reading this you are welcome to disagree in comments).

Let's get to the sweet stuff first - Guinness chocolate cupcakes with Bailey's cream cheese frosting, found over at Nook & Pantry. That I just had to make - I mean, cakes with chocolate and Guinness (or, in my case, Murphy's) covered with a mixture of Bailey's, cream cheese and butter?! I will tell you that they are as good as they sound, even though my cupcakes became very low because I misread the recipe and used baking powder instead of baking soda. D'oh! Apart from that non-intentional alteration, I followed the recipe without changes, so head on over to Nook & Pantry to get all the details. My little mistake didn't seem to impact the taste though because, yum! I can also imagine the frosting would be good with Grand Marnier or some other kind of citrus liqueur. Or with Jameson's. Yeah, maybe an Irish coffee frosting, with coffee and whisky and brown sugar. Good thing I ended up with quite a few cupcakes in the freezer - that means I get to try those out!


Now, the maincourse, a beef and Guinness pie that I found at Epicurious. For this I made a few changes, the biggest one being covering the stew with mashed potatoes in shepherd's pie style rather than with puff pastry. The original had brined green peppercorns in it, but that was impossible for me to find. I meant to pop in a few regular green peppercorns instead but I forgot about it. If you have green peppercorns, brined or not, do add them because I think that would give a little punch that this dish was lacking. If you like cooked carrots that would also work with this, either in the stew or on the side, boiled and with some butter and parsley on top. I'm tucking the photo of this down at the bottom because this dish is not too pretty. We ran out of mashed potatoes so that's why there's a hole in the middle, in case you are wondering. Anyhoo, here's the recipe:

Beef and Guinness pie, Shepherd's style
(adopted from Epicurious.com)

Makes enough for a dish 30*25 cm

1 kg beef, cut in 2*2 cm pieces
3 tbsp flour
Salt and black pepper
2-3 tbsp butter
1 large onion, coarsly chopped
3 tbsp water
½ tbsp concentrated game stock dissolved in 1 cup water
1½ cup Guinness or other stout
1 tbsp Worcestershire sauce
5 fresh thyme sprigs
100 g forest mushrooms, quartered
Mashed potatoes for topping (use your favorite recipe, mine has potatoes, butter, cream, nutmeg, salt and pepper).

Set the oven to 175 degrees C. Mix flour, salt and pepper in a shallow dish. Pat the beef dry. Turn the pieces around in the flour to coat them, shaking off excess flour. Heat most of the butter in a large pan, preferably oven-proof. Brown the beef in batches, and transfer the done pieces to a bowl. When all the beef is browned, add the rest of the butter to the pan and then the onions and water. Cook until the onions are soft. Then return the beef to the pan (make sure to get all the juices that may have accumulated in the bowl), and also add dissolved stock, beer, Worcestershire sauce and thyme. Bring to a simmer. If your pot isn't oven-proof, transfer all the meat and liquid to a large oven-poof pan (I used a rectangular Le Creuset dish, about 30*25 cm.). Cover with a lid or with foil and braise in the oven for about 1 hour and 15 minutes, until the beef is tender. Take the pan out, add the quartered mushrooms and braise for another 15-20 minutes, now without lid/foil. You can prepare this far (it would hold up well in the fridge overnight).
Increase the oven temperature to 225 degrees C. Make your mashed potatoes, and place them on top of the dish. If you want a pretty look, you could pipe them out (we didn't). Bake in the oven for about 20 minutes until the mashed potatoes are turning golden brown.

2009-03-16

BYOB


BYOB - Bake Your Own Bread!
Making your own bread is so satisfying. Once you have mastered the basics, it's easy to be creative and play around with what you have in your pantry. You can control exactly what goes into the bread - no weird additives and chemicals - and there's something very calming about kneading a dough and then letting it fill your house with the most wonderful smell as it transforms to bread in the oven. And then eating the fruits of your labor, warm and fresh out of the oven, with just some butter and maybe together with a cup of tea...

Tonight, I wanted to make a carrot bread from one of my favourite cookbooks, Citrusköket by Caroline Hofberg. It's a beautiful book filled with really inspiring recipes, all containing some kind of citrus fruit. There's recipes for main courses, both fish, poultry and meat, for side dishes and salads, for marmalade and curd, for deserts, cookies and bread. Such a lovely book - unfortunately I think it's only available in Swedish. The carrot bread recipe I wanted to try contained orange zest and dried and ground peel from bitter orange. Unfortunately the carrots in the pantry had gone bad, so I decided to use grated apples instead of carrots. Since I had already departed from the original recipe, I went digging around the pantry and added whatever appealed to me. I ended up with quite a bit of fiber (flax seed, oats) and used graham flour rather than rye as the original recipe said. The dried apricots was Markus' idea. Try to use good organic apricots that haven't been treated with sulfur - they will naturally be brown rather than bright orange, and they taste much better. The apples don't give any real taste, but they really add to the texture. This bread is best eaten fresh but freezes well and can be reheated carefully.


Apple bread with apricots
Makes 4 loaves

5o g fresh yeast (1 packet in Sweden)
5 dl water
Pinch of salt
1 tbsp aniseed (I used whole seeds and bashed them up using a mortar and pestle)
Zest from one small orange
2 tbsp rapeseed oil
1 tbsp honey
2 dl grated apples (about 3, squeeze out as much of the liquid as possible)
4 dl graham flour
~8 dl wheat flour with extra gluten (Vetemjöl Special in Swedish)
½ dl flax seeds
1 dl oats
1 dl walnuts, chopped
1 dl dried apricots (~8), cut in small pieces

Crumble the yeast into a big bowl. Heat the water to finger temperature (37 degrees C). Dissolve the yeast in the water. Add the rest of the ingredients, but leave some of the wheat flour for baking. Work the dough vigourously by hand or in a machine until the dough is elastic but still a bit sticky. Let it rise for one hour, covered with a cloth. Get the dough onto a lightly floured surface, but don't knead it. Just divide it into four equal parts, and shape them into twisted, long and narrow loafs. Don't try to make them perfect, they should look rustic and home made! Place them on a parchment covered baking sheet, cover with the cloth again and let them rest for 30 minutes. Set the oven to 250 degrees C. Bake the bread in the middle of the oven for about 15 minutes. Let them cool on a wire rack.

Salmon burgers without bread

I love salmon - it's so versatile, good for your health, and here in Sweden we are lucky to get it relatively cheap. Tonight we decided to turn salmon into burgers with a bit of Asian flavour. However, we found that our bread had gone too old so we served the salmon patties without bread but with oven-roasted potatoes instead. On the side we also had some green salad, a slice of grilled fresh pineapple and a sweet chili dressing (sweet chili sauce mixed with crème fraiche and some salt and pepper). You could easily turn these into burgers with those elements (bread, salmon patty, salad, pineapple, dressing) but it was really good this way too. The salmon, the sweet and spicy dressing, and the juicy pineapple works very well together. Sorry about the bad photo, I was hungry...!


Asian-flavoured salmon burgers

Serves 2 + 1 lunchbox

500 g salmon
½ dried red chili fruit (substitute ground chili powder if you want to)
3 stalks spring onions (scallions)
1 egg
3 tbsp bread crumbs (very fine)
Salt
Butter to fry in

Cut the salmon into smaller pieces and place them in a food processor. Cut the chili fruit very finely. Chop the spring onions (scallions) and place them and the chili in the food processor. Using the pulse button, grind the salmon coarsly. You don't want it too mushy so be careful! Add the egg, the bread crumbs and some salt. Using a spoon, mix everything around. If the mixture is way too loose, you can add some more bread crumbs. Place it in the fridge to firm up while heating some butter in a large frying pan. To fry, take a big spoonful of salmon mixture and place in the skillet. Use a spatula to flatten it out and shape it into a roundish shape. You want it to be about ½ cm thick. Fry for about 2-3 minutes on each side, until the salmon is cooked through.

For serving:
Grilled French bread if you want to make burgers (please don't use hamburger buns!)
Sweet chili dressing
Mixed greens
A slice of grilled fresh pineapple

2009-03-13

My first time

Poaching eggs, that is. I found this salad in a Jamie Oliver cookbook, Happy days with the naked chef, that I got at the annual book sale a few weeks ago. I made a few changes, like omitting the garlic since I'm going to sit on a bus for four hours this afternoon and wanted to be nice to my fellow passengers. I had never poached an egg before, and I was a bit freaked out when I saw the surface of the water covered with coagulated egg white and I couldn't see what was below. A horrible inedible mess? Cthulhu? But it worked, and the salad tasted lovely: the crispy bread, the salty pancetta and parmesan, the perfect egg with the yolk still a bit runny... I'm probably freaking Markus out here because he hates eggs and would think that I have ruined perfectly good pancetta and parmesan with this, but if you do like eggs, try this, because it's great!


1 chunk of French or Italian style bread
Olive oil
Flaky sea salt
3 strips of pancetta
A handful of mixed greens
More olive oil + white wine vinegar
1 egg
A small piece of parmesan cheese

Take the chunk of bread, remove the crust and tear it into bite sized pieces. I used organic French country style bread made with stone ground rye, but ciabatta or a baguette would work as well. Sprinkle olive oil on top and season with some sea salt. Put in the oven at 200 degrees C for 8-10 minutes, until the bread is crusty. Cut the pancetta in smaller pieces and place that on top of the bread. Put in the oven for another 4-5 minutes until the pancetta is crispy as well.
Place a handful of mixed greens on a plate and drizzle some olive oil and vinegar on top. Put the bread and pancetta over the salad. Now, poach the egg. Bring water to a simmer in a pot, and crack the egg into the water. Don't stir, don't do anything, just let it boil for 4 minutes (more if you don't like your yolks runny). You will probably end up with a lot of coagulated egg white on top of the water, but when you remove the pan from the heat and lift up the eggs with a perforated ladle, you will find that the white has surrounded the yolk and that all your worries were unfounded! Place the egg on top of the salad, and finish off with some shaved parmesan. Enjoy!

2009-03-11

How do you like them apples?

Time for ice cream again! This time it's apple time! This is one of those two dayers, so make sure you have enough time. On the first you make the ice cream batter and the apple puré. On the second day you run them through the ice cream maker and put in the freezer. On the third day you enjoy. The puré could probably just as easily have been made on the second day, and the enjoying can get a good head start on the second day. So, here are the recipes.

Ice cream batter (vanilla and cinnamon)
1 sheet of Gelatin (~2 g)
½ Vanilla Stalk
2 pcs Cinnamon
2½ dl Cream
2½ dl Milk
25 g Honey
120 g Egg yolks (~6 pcs)
125 g Sugar

Put the gelatin in cold water. Cut the vanilla stalk in two and scrape out the seeds. Add the seeds, stalks, milk, cream, honey and cinnamon to a pot. Whip the egg yolks and sugar firm. Bring the cream mix to a boil and pour it over the egg and sugar fluff while whisking. Pour it back into the pot and bring it to 85°C. Squeeze the water out of the gelatin and dissolve it in the batter. Put the pot in a cold water bath and let it cool down quickly. Strain it and keep it covered in the fridge (at least over night).

Apple Puré

4 Apples (I used Granny Smith)
Sugar (see below for amount)

Peel and core the apples. Grind them on the finest granularity of the old knuckle buster, or just mix them I guess, I wanted to keep some texture of the apples. Add 10 % sugar by weight. Bring it to a boil and let it cool. The sugar is supposed to keep it from crystallizing during freezing, so i thought it a good measure when making ice cream. Not sure if it's strictly necessary though.

Putting it all together
Run the ice cream batter and the apple puré in an ice cream maker for about 30–40 minutes and then let it freeze for a few hours. Serving suggestions (and hopefully pictures as well) coming up later.

2009-03-09

Monday Macaron Madness

Do you know what a good activity at 9.30 pm on a Monday evening is? We do: it's making macarons for the first time! Crazy? Guess it fits us then... :-)

We figured we'd start off easy and try a plain almond macaron with dark chocolate ganache for filling. So, we need a chocolate ganache and some macarons! Here's how we made them:

Chocolate ganache
125 g Cream
100 g Dark chocolate (70%)
20 g Honey
1 tbsp Havana Club Añejo Especial (Cuban rum)

Chop the chocolate finely (go ahead, be as masochistic as me and do it by hand, or use a mixer). Add the rum to the chocolate. Mix the cream and the honey in a pot and bring it to a near-boil experience. Pour the cream mixture over the chocolate and fold it together. Let it stabilize in the fridge.

Macarons
We basically ripped one of Tartelette's excellent recipes. Although it originally called for pistachios we just substituted them for even more almonds.

90 g Egg Whites (about 3)
30 g Sugar
200 g Confectioner's Sugar
110 g Almonds

Mix the confectioner's sugar and almonds to a fine powder. Whisk the egg whites and add the sugar gradually until a meringue is formed. Fold in the almond/sugar powder until the whole batter has a “magma-like” consistency. Use a pastry bag with a plain tip to pipe 2 cm rounds on a parchment covered baking sheet (or two in our case). Let them sit and harden for 30–60 minutes before baking them in 130°C for 20 minutes (or longer if you made them bigger). Actually, make it longer and make them bigger, that's what Tartelette (a.k.a. The Macaron Queen of the Blogosphere) does... Let them cool before assembly. Supposedly, they survive well in the freezer, and two baking sheets of macarons is quite alot if you're not having guests over. We'll have to get back to you about that though, we're definetly shoving some of them in the freezer before assembly.

Assembly
Just put them back-to-back with some filling in between! Oh, and enjoy with a glass of milk – it goes great with the sweet and chocolaty macarons!


Mmm, this looks yummy...


...let's move in for a closer look!

Also, having made macarons we feel that there should be some sort of rite of passage into a new stage of our blogospheric career, so if anyone knows of a graphic or something to proclaim that we are “amateur food bloggers with macaron capabilities,” please comment!

Today's lunch special

Since I work from home and don't have any co-workers to remind me that it's lunch break time, I sometimes forgot to eat during the day. Not a good thing, I know. But I try to get better, and today I was starving by lunch time so it was impossible to forget to eat. I decided to have a lunch date with my new friend kamut again. I won't give an actual recipe for this since it so easy to make, but here's how I went about it.


I sliced 2 small chorizo sausages (total weight about 100 grams) and put them in an oven-proof dish. In that same dish I also threw 2 quartered tomatoes, 1 small red onion in cloves, and about 1 deciliter of large white beans. I drizzled some olive oil on top, but just a little cause I knew that the sausage was going to go all juicy in the oven, and seasoned with a bit of salt and some dried rosemary. I put the whole deal in the oven at 175 degress C for about 25 minutes. When about 10 minutes remained on the stuff in the oven, I boiled one portion of kamut. When everything was done I mixed the kamut with the sausage-veggie goodness and presto: lunch!

2009-03-08

Breakfast after the day before International Women's Day

So, Jenny continued on partying yesterday, attending a five course ladies dinner at out old student's nation. There's usually some heavy drinking accompanying the heavy eating, and she had the foresight to order a day-after breakfast from me before leaving. Seeing as today is International Women's Day, I was happy to oblige. The requested breakfast consisted of
  • Bärry Körsbär (a brand of cherry flavored yogurt)
  • Grilled sandwich with mushroom sauce and bacon
  • Raspberry smoothie
  • Ramlösa (a brand of sparkling water)
  • Potato crisps (real ones, not Pringles) and dip
Most of the list could more or less be bought, and that I did. The grilled sandwiches and raspberry smoothie had to be made, and that I did too, so here are the recipes:

Grilled sandwich with mushroom sauce and bacon
Makes about 7 sandwiches

Mushroom sauce
(make the day before and store in the fridge)

½ Onion
250g Mushrooms
~2 tbsp Red Wine Vinegar
1 dl Crème Fraîche
1 dl Milk
Butter to fry in (quite a lump when doing mushrooms)
Salt
Pepper

Finley chop the onions, and dice the mushrooms (I like them to be identifiable as mushrooms, so quite coarse). Fry them in butter at heat 5 (out of 6). When they start getting some color: add the vinegar and let it reduce. Add the Crème Fraîche and milk, and let it reduce until very creamy. Add salt and pepper to taste. I like the taste of black pepper with mushrooms, so I used quite a lot, letting the pepper be a part of the taste of the sauce.

Assembly and grilling

for each sandwich you need:
2 slices Toast Bread
Cheese to cover them
2 slices Bacon
Mushroom sauce from above

Fry the Bacon. Cover the Toast Bread slices in Cheese (I used cheddar). Add the mushroom sauce to one of the slices, and the Bacon slices to the other. Put them together and grill in a sandwich grill (or equivalent) until done.

Raspberry Smoothie
Makes two tall glasses

1 Banana
2 dl Frozen Raspberries
2 dl Filmjölk or yogurt
1 dl Milk

Mix it all togeather in a blender. Usually, you need ice cubes for a smoothie, but the frozen berries make up for that by being, well, frozen.

That'll fix anyone right up!

2009-03-07

Pancakes the day after

We celebrated a friend's birthday yesterday, and got home quite late after quite a bit of wine. There wasn't much breakfast in the house this morning, but we did have ingredients to whip up some American style pancakes. I got the inspiration for these through a book called Waffles and Pancakes by Kate Habershon.

These pancakes have a fresh and sophisticated taste. The grapefruit adds tang and the poppy seeds a certain crispiness and a little nutty flavour. I never get my pancakes to be small, round and pretty-looking and I know that the picture below is badly composed and shows unevenly fried pancake lumps, but do you think I had time to arrange a nice-looking photo when there were pancakes drenched in maple syrup waiting to be devoured?!


Pancakes with blue poppy seeds, grapefruit and banana

2½ dl flour
½ tsp baking powder
½ tsp baking soda
barely ½ dl light muscovado sugar or raw sugar
½ dl blue poppy seeds
1 egg
1 tbsp honey
3/4 dl sour milk (or crème fraiche)
1 dl milk
Zest from one grapefruit
1 banana, sliced

Mix the dry ingredients in a bowl. In another bowl, whip the egg, honey, sour milk and milk together. Add the grapefruit zest and then the dry ingredients. Mix into a uniform batter without any lumps. Add the banana slices and stir carefully. Heat a skillet with some butter. Place a small amount of batter (or a big amount if you're impatient like me and don't care about appearance) in the skillet. Fry over medium-low heat until the downside is golden brown and small bubbles are appearing on the surface. Turn the pancake over and fry until the other side is golden brown. Keep the pancakes warm under foil while you fry the rest. Serve with maple syrup.

2009-03-05

Clumbsy's marshmallow ice cream

In the last daring bakers challenge, fellow baker Clumbsy Cookie made what looks like an awesome contribution featuring marshmallow ice cream – although I'd've probably called it meringue ice cream if it was my recipe. Having laid eyes on this treat I could get no rest until it was tried, we even had a couple of egg whites standing in the fridge!

The problem was that this was one of those crappy days where our good friend Murphy (yes, we have a good friend named Murphy, she swears it's not her fault) seemed to be everywhere, and thus everything that could go wrong went wrong. I over cooked the sugar for the meringue while whipping the egg whites to a fluff that was just a little to big for the bowl to hold comfortably. Whisking in the over cooked sugar meant that some of it formed hot solid bullets that, left to the mixer's mercy, were shot in all directions. Yeah, you really do have to take a minor burn when working in a kitchen. With what felt like half of the sugar either in the pan or in pellets form mostly in the bowl, something like a meringue emerged. A little too big for the bowl, but still a meringue. It was, however way to fluffy to pour down the hole in the ice cream maker, some of it ended up on the side. Clean, clean and 30 minutes later, the ice cream batter had lost most of it's air in the ice cream maker, and was ready for the freezer. In short: Murphy's law holds, at least some days.

Funny thing is: the ice cream still tasted awesome! :-)

Oh, and since I didn't say it out right: thanks Clumbsy for a cool ice cream recipe! I love ice cream and meringue, so this is right up my ally!

Kamut, a new discovery


Last week we got red beets in our organic fruit and veggie box. I love beets, Markus not so much, so I get them all by myself! Today I boiled them and made a lunch salad with a stellar flavour combo: red beets, chèvre and honey. I wanted something more substantial in the salad as well, and while browsing the rice and pasta section of our small neighborhood grocery store (overpriced and with a lot of ready-made junk - we live in a student area) I found organic kamut. I had never tried that before and was pleasantly surprised. The nutty flavour worked really well with the other ingredients (speaking of nutty: pine nuts would also be great in this salad) and the texture was pleasant - a bit chewy but not stuck-in-your-teeth grainy. A nice alternative to bulgur, quinoa or couscous. I used just-boiled beets and kamut in my salad, so it was partly warm (I think warm salads feel more filling for some reason), but it would work with cold ingredients as well. I could see a big bowl of this on a buffet table, served with thinly sliced herb-marinated roasted lamb. Mmmmmm.........


Kamut salad with red beets and chevre

1 quite big lunch portion

1 portion of kamut
3 small red beets, boiled
50 g chèvre (goat cheese)
1 handful fresh baby spinach
Honey
Olive oil

Boil the kamut as directed on the package. Slice the beets thinly. Mix kamut, beets and spinach, sprinkle the chevre on top and drizzle a little olive oil and honey over the salad.

Carrots are good for your eyes (and for you muffins)

A while ago, I tried to make apple muffins with cream cheese filling. It didn't work out as planned (still delicious though), so I made a new attempt yesterday, with carrots. This time it worked (because I used regular cream cheese and didn't mix it with any egg which, duh, I knew last time as well), and you get a nice little surprise when biting into the muffin and finding a soft cream cheesy center. If you want a sweeter filling, you could mix the cream cheese with some sugar, but I like it plain and a little salty. I think it works well with the overall "healthier" feeling of these muffins that you get from the carrots and the whole wheat flour.
And sorry, no picture of this. It's too dark and I think you've all seen a muffin before, right?

Carrot-lime muffins with cream cheese filling

Makes about 8 big muffins , or 15 small ones

2 medium sized carrots, grated
100 g butter, melted
2 egg
2 dl sugar
2 dl flour
1 ½ dl graham (whole wheat) flour
2 tsp baking powder
2 tsp cinnamon + 2 tsp for the filling
Juice from ½ lime
1 dl cream cheese (Philadelphia)

Beat the eggs and sugar together until the mixture is light and fluffy. Add the rest of the ingredients and mix until everything is just incorporated. Mix the cream cheese and cinnamon together for the filling. Fill muffin paper cups with a hefty tablespoon of batter. Place a dollop of cinnamon cream cheese on top (make sure it goes in the center so that the muffin batter will go around it) and then top with another tablespoon of muffin batter. Bake at 200 degrees for about 15 minutes.

2009-03-01

Banoffee pie

One of our favorite restaurants in Hong Kong was called Jaspa's. I guess one of the reasons we liked it was that they served European style food, very similar to what we sometimes make at home, making it a nice break from the, albeit delicious, wontons, BBQ pork, dim sum and various noodle and rice dishes we otherwise ate.

Jaspas also hade the most delicious banoffee pie:


Now, after a while you might see something wrong with this picture. The plate and the glasses all look proportional, but that piece of cake on the plate... it's huge. We made the mistake of ordering one desert each the first time we went there. The next time we asked to share. Something I really loved about eating out in Hong Kong was the prevalence of "family style eating" when you order a couple of dishes for the table and then share. This wasn't done only in Chinese restaurants, but seemed okay everywhere. Our favorite Italian place (seriously, if you're ever in Hong Kong, have the homemade salsiccia with polenta at Grappa's in Pacific Place) would even serve one salad on two plates, and you were only charged for one portion. Such a great concept!

But I digress. Back to banoffee pie, this extremely sweet and gooey desert that I guess you either love or hate. We got bananas in our organic produce box this week, and when they had gotten too ripe to be eaten as is, we decided to put them in a banoffee pie. Now ours didn't look much like Jaspa's as it was about one third of the height of theirs, but the taste was damn close. We decided to add some meringue batter to the whipped cream to make it hold its shape better and make it fluffier.

There is no baking involve in making this pie, but you do need to boil the can of condensed milk for at least two hours and there is chilling time as well, so make it well in advance.


Banoffee pie

8-10 servings

1 can (397 g) condensed milk
250 g Digestive biscuits (graham crackers)
100 g butter
5 small bananas, or 3 bigger ones
2 dl cream
Merengue batter (see here), half of the volume of the whipped cream
Sifted cocoa powder for decoration

Place the can of condensed milk (unopened!) in a pot of boiling water. Boil for at least two hours, refilling the pot with boiling water as necessary. The water should cover the can of milk.
Meanwhile, make the crust. Crush the biscuits, either by hand or using a mixer with blade. Melt the butter, and add to the crumbs. Get a springform about 25 cm in diameter, and press the crumbs into the pan to form the crust. Cover with foil and let it set in the fridge while the milk is boiling.
When the milk has boiled in the water bath for at least two hours, get the can out and let it cool for a while so that you can handle it without getting blisters on your hands.
Cut the bananas in thin slices and place them evenly at the bottom of the pie crust. Open the can of condensed milk, which has now turned into a lovely dulche de leche and pour it on top of the bananas.
To make the whipped cream-meringue topping:
Whip 2 dl of cream into soft peaks. Make a meringue batter (see linked recipe above). Measure how much whipped cream you have got. Take half that volume of meringue batter and fold that into the whipped cream. (Sorry, we didn't take note of the correct measurements, but the rest of the meringue batter can of course be used to make meringues, we did that and got about 12 small meringues).
Spread the whipped cream-meringue on top of the pie. Cover and let it set in the fridge for a while. Sift cocoa powder on top just before serving.
This is very sweet, so a thin slice goes a long way...